Monday, November 22, 2010

Force


This piece is concerned with the forces at work in it the titanium plate is very stiff and pulls on the steel cable, but the steel cable is strong enough to take it bending the titanium into a parabolic arc. The cable is crimped in two places by silver elements the one holds the titanium arc in place the other holds the two ends of the steel cable together. This shows this difference in the steel cable when it is at rest and when it it’s under strain. This piece combines both my main inspirations bridges and arches

Split continuum


The construction of this ring is similar to the bangle but in this the bands are spread out by crimping them in a silver bar to create more volume. The rings run around threw the tube and out in a different direction then back in again to make a never ending cycle

Continuum


In this piece I decided that I should not break up the strength of the steel cable by cutting it and the joining it up again. Instead I used one long piece and looped through tube then crimped the end making a never ending loop. The cable is made different lengths so when it hangs on your hand, some cables can hang lower than others


Linear strength


This silver and steel cable chain highlights the strength of the steel cable by laying the steel in the same direction the chain runs. While the chain looks delicate each link can support 18kg because of the inherent strength of steel cable.


V link earrings


These silver and steel cable earrings are cross sections of arches they curve to crate a space. The dyed nylon coating on the outside draws your attention to the steel cable so thin and yet so strong. The chandelier earrings are experimenting with movement


V link chain


This chain is based on the V made at the top of a lancet arch. The steel cable mirrors the arch in its strength the silver is the ground the arch stands on. The arch is strong because of its shape. The steel cable is strong because of the material it is made of. Both these strong lines come together in this piece.


Hour glass chain


I was trying to make a chain with steel cable and silver the inspiration behind it was how hours link onto each other in a never ending chain. The thin strong steel cable holds the past and the present together. Each link is made to resemble an hour glass. I crimped each piece on one after the other as time went by.


Holding steel


I looked ay how they hold steel cable in architecture to work out how I was going to go about it.


The first way I found that steel cable was held in place was by tightening a screw against it. this was a very simple solution and it meant the cable could be taken out easily if it need ed to be replaced the problem for me using this technique was Im working on a much smaller scale and the treads for these screws would have to be tiny also I’m not sure I need to be able to take the cable out


These cables that are held together with plates and screws are extremely ugly and because they stick out so much away from the cables they break up the lines too much I definitely cannot use this to hold my steel cable it I want a clean line.


This way is a lot more elegant the cross over is two disks that tighten using a grup screw also notice the grub screws on the steel cable supports attached to the angle iron. They are very well hidden I could perhaps use grub screws to make a clean looking piece. But I would still have to make very tiny threads and I would like to avoid that if I can


On this anchorage the cable is crimped into a tube making a very clean join I think crimping will be a much better route for me because it will be quicker and will make a cleaner join if I do it right. Another way of crimping is to make a double tube and to crimp a loop this could perhaps be useful in my jewellery. I would however like to make the metal that I’m crimping a feature as well as serving a function so I will work on ways to do this.


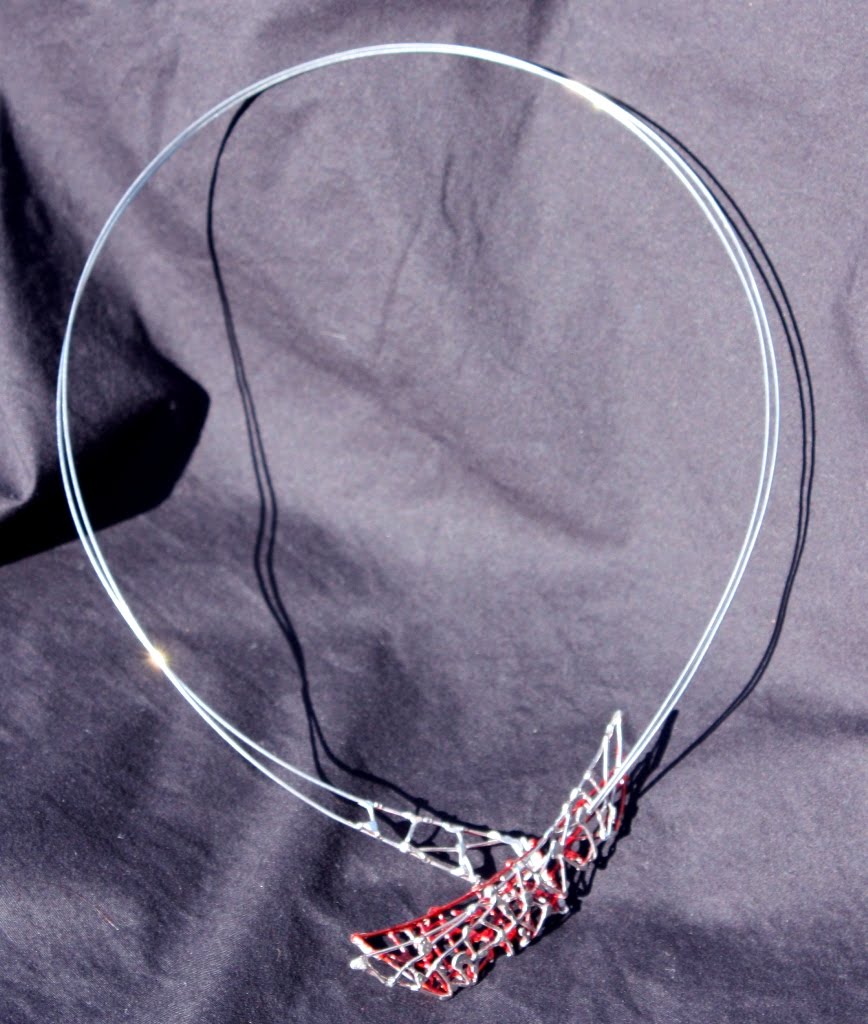
I had to find a way to hold steel in place that would be both strong and not break up the outline of the piece or distract from the steel cable I did this by cutting slots into silver elements and crimping the cable in.

After making tools and trying them I found the best way to do it was to use one slot to hold them and then just use a vice or parallel pliers to crimp the cable in.


I also found that a squished tube worked well to hold the cable. I put the cable in then forge it so it holds the cable tightly


Steel Lines

I wanted to make jewellery based on strong lines but this time I wanted to use a strong material and not rely on shape I chose steel cable because of its strength.

Deconstructed


This platinum piece was based on the idea of deconstructing the folded shape it is made up of wires that are fused together then bent and forged to give them strength the lattice work is based on blood vessels that run threw the body it is emphasized by the red interior


yin yang


This folded shape bangle is inspired by yin and yang the concept of equal but opposite forces than need each other. The two silver halves are held together by steel cable so they cannot escape each other they are complete opposites to each other one is oxidized the other polished. They both open in different directions yet they have the same silhouette. I have again drawn upon the sward as inspiration for the line where the oxidation is polished off


Cold earring


These folded silver earrings are oxidized to make it dark on the outside and painted bright blue on the inside this crates a contrast between the dull outside and the bright pigment on the inside that draws your eye into the coloured space. The wire is glued into the spine in the same way as the ‘Steel’ piece


Steel


This wrist piece was made out of aluminum and steel cable it also used the forging technique. I was trying to see how big I could make go. The outer colouring is reminiscent of Japanese swards. The steel cable is glued into the spine of the folded shape then painted over. It is a continuation of the ‘soft and hard’ piece wrist pieces theme. It was made for the Red Eye art event held in Durban


Hard and soft


In this wrist piece I have folded the strength giving curves found in arches into a sheet of silver. It is combined with rubber cord to soften the hard lines of the piece. The blue pigment is there to draw your eye into the volume crated.


Folding metal


I decided on plate to make up these pieces because it would use less material I then had to work out how I was to make a flat object make up volume. I found a way to fold it where I forged the plate over a metal tool that I made with the use of another tool with a V cut into it


I would first make a curved dome like shape then I would put the ridge in the back by using a V shaped tool then forge a curve into this would make it stronger because the curved ridge made it stiffer and it also gave it the strong lines I was looking for


The success of this technique led me to make better tools I modified some panel beating tools. These worked better because there was a larger surface for forging and I also made a tool with a deeper V so it did not scar the metal so much.


And even tools to make the curve go the opposite direction to the opening I would later make another one of these tools when I got more panel beating tools.


Volume

I want to make jewellery based on arches I want it to use as little material as possible and make up volume in the same way arches do. With curved lines to strengthen

My work

My work can be divided into two sections jewellery based on arches and arcs and jewellery based on steel cable.

In the first section called Volume the jewellery is based on the strong curved lines found in arches I wanted to use these strong lines to make up volume the same way arches can make up volume because of their shape I developed a technique to fold plate that is similar to anticlastic razing.

The second section called Steel Lines I deal with jewellery based on steel cable. The idea behind them was to use this strong line to make jewellery. I had to work out a way to hold the steel cable so it would be both strong and would not brake up the lines I was trying make

Tuesday, April 6, 2010

links

I think this chain is interesting because of the way it moves. I do however feel that it should maybe have a different shape for the silver sections perhaps a marquise shape would look more delicate. In my next chain I want to use the steel cable in more of a directional way so it is more obvious that the force is directed along it.

Wednesday, March 31, 2010

Cantilever-spar cable-stayed bridge


another of Santiago Calatrava master pieces. i love the way the cables are strung and the curved deck. it is different from a normal Side-spar cable-stayed bridge because the tower is angled away from the bridge this exerts overturning force upon its foundation. i like this because it makes it look like the tower is pulling the bridge up and so makes the forces at play more obvious

Side-spar cable-stayed bridge


one of the variations of a cable stay bridge is a Side-spar cable-stayed bridge. in this bridge the tower is offset to the side making it possible to make a bridge that curves. being a fan of asymmetry i like this.

Suspension bridge


what i like about suspension bridges is the parabolic curve that the main cables make. what i dont like is also the cables, i dont like how the force is distributed. the weight is still entirely supported by the towers, but there have to be huge anchorages at the ends of the main cables to stop them from being pulled out of the ground. it lacks the simplicity of a cable stay bridge.

Cable-stayed bridges


I love the way these brides look and the way they use force. the bridge deck is held up by cables that are connected to the towers. normally each deck section has its own cable. because the cables are at an angle they pull the deck sections towards the tower and pushing them together. what this means is that both the compressive and tensile loads are directed into the tower and the whole weight is supported by the tower. I see this as a more elegant solution than a suspension bridge

Tuesday, March 30, 2010

finaly finished a piece

completed the chain yesterday. I really like how it moves and the way the links can lie in different positions.

Tuesday, March 23, 2010

Scarred Earth


I love how this building looks...the curves are amazing and i love how it seems to be floating off the ground. I really hope it ends up as green as the concept rendering. i think its really sad how we can create something so beautiful on the earth, but then also we scar it and destroy its natural beauty

Wednesday, March 17, 2010

second link


this is the two span link. i made the steel spans too long after looking at it i decided to make a few more links the same to see how it looked and decided i kind of like how the links can move and lie in different positions i will still do another chain with shorted spans but i will also make this one.

test link


this is the 1st link i made with my new tool. it came out alright on the one side and I'm sure i could perfect it, but it is not very easy to make and it takes to much time. after looking at it a realized that it does not need four steel cable spans so i decided to simply it so it only had two.

Evolution


this is the new tool i have made it has a tab on the back so i can press it against the vice and a small ledge under is for the link to rest on. With this i can hold the two tools and the link with one hand and tighten the vice with the other.

A little glue goes a long way

since i started working with steel cable i realized that it was very hard to work with because it wants to spring everywhere except where you want it to be. I have been trying to solve this problem with binding wire and other methods to try hold it in place these all failed...then the other day i realized the answer came in a bottle all i need is a small drop of glue to hold it in place.

Tuesday, March 16, 2010

long way around


after struggling to crimp my new prototype link i decided to make a tool i could just put in the vice with the link... it works relatively well but it is still hard to use because i need to hold two of these and the link while i tighten the vice i need to make something that can hold all three together so it will be easier

Battered and bruised

this is the 1st test piece i have made after trying different ways to crimp the steel cable in i finally made a tool and used that but it still need refinement

Tuesday, March 9, 2010

Design

Design, itself, is often difficult to define to non-designers because the meaning accepted by the design community is not one made of words, "wikipedia"
I find this idea interesting...

Carnegie Mellon's School of Design, "Design is the process of taking something from its existing state and moving it to a preferred state."
For me a well designed item has had all the ugliness taken out of something.

Chartered Society of Designers, "design is a force that delivers innovation that in turn has exploited creativity"
I feel that what I am trying to capture in my jewellery is this 'innovation' I want to show it in a different way to make people notice it...

ICSID (International Council of Societies of Industrial Design), "Design is a creative activity whose aim is to establish the multi-faceted qualities of objects, processes, services and their systems in whole life-cycles. Therefore, design is the central factor of innovative humanization of technologies and the crucial factor of cultural and economic exchange."

I like the idea of humanization of technologies...I feel that often technology is a form of synthetic life we create. i also feel we try to imbue these items with human qualities to make them more a part of ourselves...

Monday, March 1, 2010

Connectors

I found this connector on the net I wander if i could use a similar connector in jewellery. I would like to try make one with rivets instead on bolts.

some photoshop


this is some Photoshop work i did for shining lights I am relatively happy with how it came out I still looks three dimensional and the sparkle came out great. I need to work on making it so you can see the individual stones though

Thursday, February 25, 2010

final link


I have finally worked out a link that will work. The cables are held together in two different holes this way i can stop the cable from rubbing and also stop the leverage problem. the movement is almost right now the only problem is that i need to find a better way to close up the holes the just bending id over makes holes oval and this restricts the movement.